Tuesday, November 29, 2016

Chunky Race Quilts Finished


I am happy to share five more finished quilts today.  They use my Calculations for Race Quilt Variations.  I described a little bit more about how they were pieced in my last post.  These will be going to Primary Children's Hospital for children staying there for Christmas.  (That is where some very similar quilts went last year.)


One of the reasons why I love sewing quilts like this is because they come together fast, allow the fabrics to shine, and then I can play with the quilting.

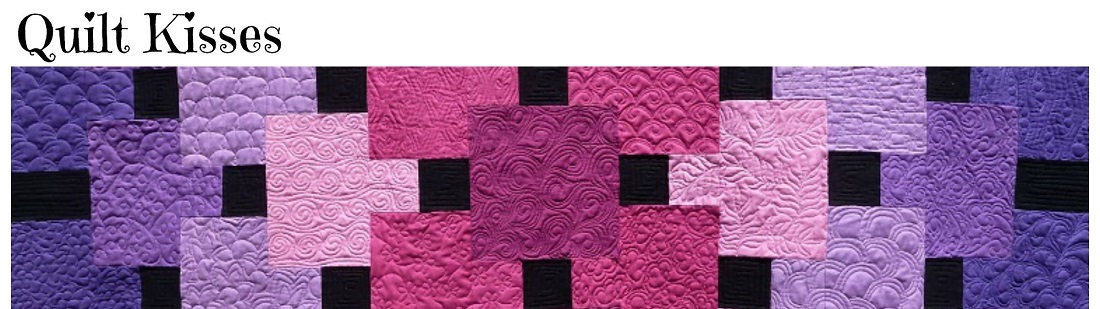
This first quilt has a different design in every row.


The second quilt has a different design in each of the eight colors.


The third quilt has feathers which take up two rows.


The fourth quilt was quilted in an all over design.


The last quilt is quilted with ribbon candy in every row.


I love playing with different FMQ designs.  It would be hard for me to pick a favorite out of these quilts.  (Although I almost decided to keep the black and white scrappy quilt.)  All five of these quilts finish at 41 by 56 inches.  For more information about the piecing and the fabrics used in the quilt tops, check out my previous post.

Here are all seven of the quilt going to Primary Children's for Christmas.


My friend will be picking them up soon to deliver them to the hospital.

XX,
Jasmine

P.S.  I will be linking up with some of the fun parties on my sidebar.  Check them out for quilty inspiration.

Friday, November 25, 2016

Chunky Race Quilts In Progress


I made five quilt tops using my Calculations for Race Quilt Variations.  However, this time I was mostly using stash instead of scraps.  So I decided to make calculations for quilts exactly 41 by 56 inches using 4 inch wide and 18 inch long strips.  I figured that I needed 37 eighteen inch strips and 1 eight inch strip.

I went one step further and tried to figure out if I could plan where each of the fabrics would end up instead of it being completely random.  I started out by making a paper quilt.  Instead of thread to hold it together I used tape.


Then I laid out my 38 pieces on my design wall, remembering that pieces on the end of rows will be in two different places.


I used my paper guide again to pick up the pieces in order from 1 to 38.  Then I sewed it into one long strip and used the Jelly Roll Race method to sew it together.


Every time I folded the strips in half I referred back to my paper to make sure I sewed on the correct side of the pieces.  I am pleased to say that it worked on my first try.


I call that planned random.  :)  This method worked for four more quilts.


I love how it all worked out.  The first quilt used eight fat quarters.  It was mostly Jungle Ave by Art Gallery Fabrics.   I won those fabrics participating in the Hands2Help challenge last year.  The Second quilt used eight Fabri-quilt solids I won in a giveaway at Quilting Jetgirl.  The third quilt used scraps from ten different projects.  The last two quilts used Jungle Party fabric I won at the Inspired by Fabric Blog, plus some Wild Side Timeless Treasures fabric from Christine and scraps from Cheetah's quilt.  

These quilts will also be given to children staying at Primary Children's Hospital for Christmas.  I will share the finished quilts next week.


XX,
Jasmine

I will be linking up with Oh Scrap for this fun use of scraps in a couple of the quilts.

Tuesday, November 22, 2016

Stripe Quilts Finished


Both of these girly quilts were made with the leftovers of other projects and some stash.  They will be given to children staying at Primary Children's Hospital for Christmas. I showed a sneak peek at the quilt tops in my previous post about my design wall.  The quilting makes a big difference!


This princess quilt was made with the leftovers of my princess pillow and my Floating quilt.


I had so much fun quilting it on my Tiara.


The backing was mostly left over from my Berry Pie quilt.


I love the pansies!


The binding was leftover from my Modern Farmer's Wife quilt


I love how this quilt turned out.


Quilt Stats #188
Name:  Princess Stripes
Pattern:  Stripes of various widths
Fabric:  Kona solids and Dream and a Wish by Riley Blake
Amount Used:  3.5 yards
Batting:  Hobbs 80/20
Size:  About 42 x 54 inches
Date Finished: November 2016


This rainbow quilt was made with the leftovers of Panda's Lego Rainbow and parts of a panel I found on clearance at my LQS a couple years ago.  I think the panel adds so much to the solids. The primary colors are wider than the secondary colors because I used a strip of the orange, green, and purple, for the borders of Mr. Bones. It worked out perfectly because three of the panel squares were bigger and three were smaller.

I quilted each colored stripe differently.


The backing is an old Hoffman floral I found in my stash.


It is so bright and cheerful!


I bound the quilt in a brighter yellow solid also left over from Panda's Lego Quilt.


This was such a fun quilt to make.


Quilt Stats #189
Name:  Solid Stripe Surprise
Pattern:  Stripes of 2 widths
Fabric:  Kona solids and older panel
Amount Used:  3.5 yards
Batting:  Hobbs 80/20
Size:  About 42 x 54 inches
Date Finished: November 2016

These were great stash busting quilts for a good cause.  I will share some more stash busting quilts next.

XX,
Jasmine

P.S.  I will be linking up with some of the fun parties on my sidebar.  Check them out for lots of inspiration.

Thursday, November 17, 2016

My Modular Design Wall


I was finally able to enlarge my design wall so that it can be wider than 48 inches.  I did this by buying two more pieces of one inch thick foam insulation board.  Each of them were 24 inches wide.  I took the large flannel sheet off of my wide board, cut it into three pieces, serged the edges, and was able to cover all three boards.  It is attached to the back with extra strong Gorilla Tape.

I love my modular design wall.  I can have a four foot section like in the picture above, or I can add a second section with the corner cut off without blocking the walkway at all.  I make a lot of quilts 60 inches wide, and this is the perfect size design wall for that.


If I need a full six feet at the top I can use the other board and only block the walkway a little bit.


But if I want a really big board I can use all three.


This is now eight feet wide (minus the corner) and 89 inches tall.  While it blocks the walkway, I can still get in and out of my room.


I use a fabric scrap at the top to keep the design wall from tipping over.  I use the clips on my quilt hanger and then pin it to the board.  Monkey even tried hitting it from the back and it still stayed up.  I can use the extra big wall for a larger quilt or two smaller quilts.

A sneak peek at some stash busting quilts.
I can still store any or all of the sections in my closet and hang a quilt instead.  I love how functional and versatile this is for me.


Note:  The differences in white between the old section and new sections of my design wall is due to the fact that the four foot section is purple board and the two foot sections are blue boards.  They were purchased at two different stores so I could get the widths I wanted in the one inch thick foam insulation board.

XX,
Jasmine