Friday, May 29, 2015

My Creative Space


Welcome to my creative space, which I normally call my craft room.  I was tagged by Preeti who blogs at Sew Preeti Quilts as part of the Creative Space Tag.  And I am tagging Val who blogs at Val's Quilting Studio.  So look for her post on her creative space next week.  :)

Not much has changed in my craft room in the last year, because I really am loving the set-up.  If you would like to see what my room was like in 2014, you can check out this post.  If you would like to see what it was like in 2013, you can check out this post.

The main change in my craft room is the addition of the whiteboard near my Tiara quilting machine.


I love having it there, because I can warm-up for FMQ by drawing my design at the same size I will quilt it.  Then I can refer back to it while quilting.


I have also taken down the decorations on the shelf above my quilt, and added rainbow scrap storage.  I love having my scraps organized by color.


I am now used to having the cutting table behind my sewing chair.  (Although one of the flaps has broken off, and this is now as big as my table gets.)  I really love having access to three sides of my cutting table.


I usually work on one project at a time, so my design wall (a queen size flat flannel sheet) sometimes seems really empty.  My plan is to add a rod above it which I can hang quilts from.  I really want to have "Floating" hanging up in here when the design wall is not being used.

And just so you know, this is NOT my creative space...


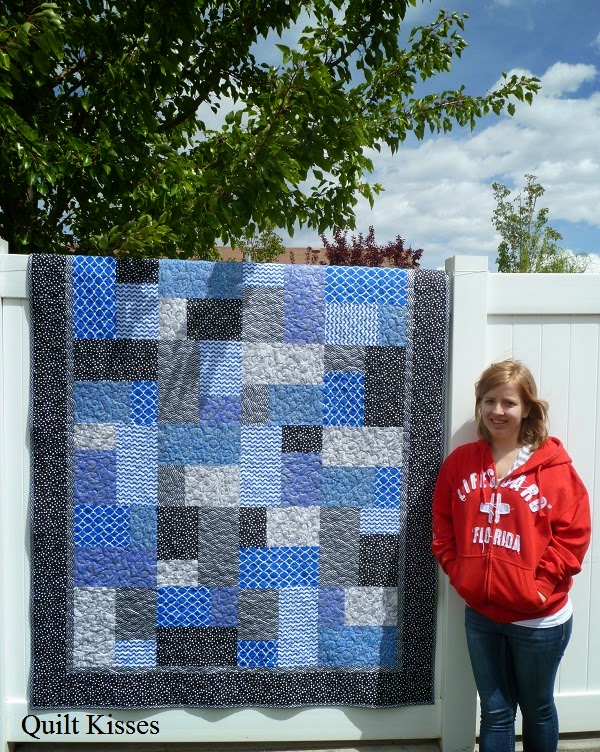
That is my dumping space, and what my craft room looks like when I haven't been working on projects in there for a couple weeks.  I am unable to create when my room gets messy.  I had to clean it up just so I could add the binding to that blue quilt you can see on the floor (finish post coming soon).  Having it clean to take pictures was just an added bonus.  ;)

And in case you have missed any of the posts in the Creative Space Tag, here they all are:

Julie at Pink Doxies (Where the game began)
Maryse at Maryse Makes Things
Lara at Buzzin Bumble
Sandra at Musing of a Menopausal Melon
Judy at Quilt Paradigm
Preeti at Sew Preeti Quilts

So be sure to watch for Val's post next week... But while you are waiting, you can check out Shannon's space here and Penny's space here.  

XX,
Jasmine

P.S.  I will be linking up with some of the fun parties on my sidebar.  You can check them out to see what other quilters are up to.

Wednesday, May 27, 2015

I Have a Quilt Ladder!


I am so happy to say that I now have a quilt ladder in my family room!

This was a project for the entire family:  Daddy built it. Cheetah helped drill the holes.  Panda gathered the extra wood.  Monkey blew off the sawdust from the freshly drilled holes.  Mommy documented it and vacuumed.


Hubby wanted to build it out of oak to make it strong in case any of the boys decided to climb on it.  (They have been instructed not to, but you never know with my busy boys.)


Don't we all need another place to store display 6-8 more quilts?


How many quilts do you think are out in my family room now?  NINETEEN!  I was a little worried about being a crazy quilt lady with padded walls.  I hoped I didn't need the straight jacket to go with it.  Luckily, Sandra reassured me that I would be more in need of the straight jacket if I wasn't quilting, so I'm good.  Right?


One wall hanging, two table runners, and six bed size quilts are over on this side.


Two bed quilts and a minky-backed lap quilt are over here.  (Easy access to the minky is a must!)


Two more bed quilts and a table runner are in the middle.


Four bed quilts and three lap quilts are over here.  (Plus some blankets are hiding in that cream cube in front of the ladder.)


And Christmas Addition is thrown over the sofa for the easiest access.  (Even if I hide this Christmas quilt  with the blankets, Cheetah finds it and wants it kept out.)

19 quilts out in the family room doesn't even count the ones stored in the game closet.  Most of those are seasonal quilts I just take out for a little while. I'm not taking a picture of that, so how about one more view of the family room?  Hopefully all the quilts just make my room seem even cozier and more inviting.  :D


I will be using my ladder the way it is for another talent display at church, then I will stain the oak a darker color.

I did take pictures along the way.  Is anyone interested in a tutorial for making this hinged quilt ladder?

XX,
Jasmine

P.S.  I will be linking up with some of the fun linkys on my sidebar.  Check them out to see what other quilters are up to.

Friday, May 22, 2015

Finishing my Niece's Third Quilt


My mother-in-law and I just helped my niece, S, finish her third quilt.  It was such a fun group project.  It was the second quilt I helped her make.   (I've never seen her first quilt.)  We worked on the other one together last November.

When she came to visit from out of state, she knew she wanted to make another quilt.  She really liked the quilt I made for my father-in-law a couple years ago, and wanted to use the same pattern.  (It is similar to the Turning Twenty quilt, but the blocks finish at 12 inches.)


I told her what fabric she would need, and she went shopping for it with Nana.  Didn't she do a great job picking fabrics to go together?  I love what she chose.  Then she came to my house to cut it out.  She went back to Nana's to piece the blocks and sew them into rows.  (Nana does the pinning and pressing while she does the sewing).  I had her come back to my house to add borders so I could teach her the right way to do it.  We went to my mom's house all together to get it quilted.


She picked a loopy star design for the computerized quilting, and helped me when it was time to roll it.  She really did such a great job piecing it.  It laid totally flat on the frames and was a dream to quilt.


She thought it was great that she could "quilt" and read at the same time.  ;)  While I personally prefer free motion quilting with its wobbles, computerized quilting serves a great purpose.  She was able to get it quilted beautifully and quickly (with a lot of help from her doting aunt).  My mother-in-law loves my mom's machine, even though she is not a quilter.

After it was quilted we went back to my house for the binding.  She wanted me to bind this quilt, but also wanted to watch this time.  The chevrons look so neat for the stop border and the binding.


This process took about a week from start to finish.  Of course, her quilt needed its own photo shoot in my back yard.  (I think she thought I went a little crazy with the camera, but her mom loves all the photos I took.)


I quilted it with a gray thread which blends beautifully with the front and back.


I even got her to add a corner label this time.  You can barely see it in the upper left corner of this photo.


I really am so proud of my niece.  Her quilts keep getting better and better.  But the best part is the bonding time we share when we work together.  She has lived in another state my whole marriage, so I treasure our time together.


It should be a fun summer this year.  Another niece came to watch the quilting and wants to finish her quilt I helped her with a year and a half ago.  (It is cut out, and she started piecing it).  Plus, Cheetah wants to make another quilt to try out grandma's long arm.  She is so sweet to share it with not only her family, but my husband's side as well (as long as I am there to operate it).

This is the third quilt we have quilted on my mom's Handi Quilter Fusion, and we are really enjoying it.  It isn't nearly as intimidating as it once was.  But for anyone wondering, I still love my Tiara best!
XX,
Jasmine

P.S.  I will be linking up with some of the fun linky parties on my sidebar.  Check them out to see what other quilters are up to.

P.P.S.  Speaking of summer... don't be surprised if I don't post as often.  I'm really looking forward to more family fun time this summer.  :)

Tuesday, May 19, 2015

A Proud Mama Moment


Cheetah just made this pillow in one of his classes at school.  The only thing I did to help was purchase the fabric for him.  He was excited the quilt shop still had some of the fabric I used in his Christmas quilt.


It is a travel sized pillow, so he even made the pillow itself which is inside.  He wanted it to be black so it would match.


It looks great with his first quilt...


And the rest of his cheetah collection.


Is it any wonder why I call him Cheetah?

He really enjoyed sewing this at school, but told me that he likes rotary cutters a lot better for cutting out fabric than scissors.

Thanks for indulging my proud mama moment.  ;)

XX,
Jasmine

Friday, May 15, 2015

Floating: A Finished Quilt


I finished "Floating" just in time for the Blogger's Quilt Festival.  It is currently my most favorite quilt.  So I am entering it in the large quilt category.  If you are visiting from the BQF, welcome and thanks for stopping by.  If not, you can click on the button to see what everyone else has entered in the festival.

AmysCreativeSide.com


The pattern for this quilt is called "Magic Carpet," and it is designed by Christina Cameli.  I changed the pattern a little bit, and you can find out more about my changes in this post.  Christina Cameli has also written two books about free-motion machine quilting, and I mostly used designs from her books with a few of my favorites added in.  You can check out this post for more information about how I quilted it.

I named my quilt "Floating" because magic carpets float in the air, and the squares seem to float on the black background.

I love to see how quilting changes a quilt.  While I really like how the top turned out...


I absolutely love the finished quilt!!!


Every single one of the overlapping squares is quilted with a different FMQ design.  Including the square spirals on the black fabric, there are 72 different designs on this fun FMQ sampler.  You can see the whole quilt in this picture.


While it looks pretty in the shade...


It really sparkles in the sunlight.


I quilted it with Floriani's polyester embroidery thread, and I love how it turned out.  There are more than 350,000 stitches on this quilt, and my thread only broke twice.  (I love the stitch counter on my Baby Lock Tiara.)  I used nine M-class bobbins and spent 18 hours on the machine quilting.  Totally worth it.


The quilt top is all Kona solids.  Starting in the center and working toward the edges, I used:  Cerise, Valentine, Candy Pink, Violet, Magenta, Tulip, and Black.

The backing is a Riley Blake Blender in Magenta.  It really is a deeper color than it shows up in the photos.  (I'm blaming that on the sparkly thread.)


It looks really neat with the sparkly threads and the light shining through as well.


I bound the quilt in Kona Black to keep the floating look.  I stitched it down to the back by hand.


I used a scrap of the backing for the label, so it blends in nicely.


I had so much fun experimenting with photography on this quilt.  It was too big for my favorite spot on the fence...


And the quilting didn't show as much in the shade where I normally hang it on the deck.


So I tried somewhere new.


It might have seemed a little windy.


But it was just my little helper.


Maybe quilts are more fun than the swings.  ;)


We both like my new hanging spot, and I wonder why I haven't hung a quilt there before.

Quilt Stats #140
Quilt name: Floating
Pattern: Magic Carpet
Fabrics used:  Kona Cerise, Valentine, Candy Pink, Violet, Magenta, Tulip, and Black
Backing:  Riley Blake blender in Magenta
Amount used: 11.5 yards
Batting: Hobbs 80/20
Size: About 75 x 87
Date finished: May 2015
What I learned:
  • I can quilt more than 70 different designs! Two years ago I had a hard time quilting only 12.
  • The more designs I quilted, the easier they became.
  • I love the look of Floriani polyester embroidery thread on solid fabrics.
  • I tense up up a bit more when quilting densely and couldn't quilt as long at a time.
  • It was more difficult (read impossible) for me to prevent tucks when quilting this densely and one color at a time.  (I quilted all the black first to stabilize the quilt then started in the center and worked out.)
  • Custom quilting takes a long time.  I pieced the quilt in 6 hours, but it took 18 hours to quilt it.
  • I need to check for grease on my needle bar before quilting, especially if I just had it serviced.  


I plan on keeping this quilt in my craft room, but Cheetah thinks it would be perfect for a game of Twister.  Silly boy.

Thanks for stopping by!

XX,
Jasmine

P.S.  I will be linking up with the Blogger's Quilt Festival and other fun linky parties for my finished quilt.  The buttons are on the sidebar.  Check them out to see what other people are doing.

Wednesday, May 13, 2015

Fixing my Magic Carpet Quilt

I am happy to say that "Floating," my magic carpet quilt, is fixed.  The grease stain is gone.  How did I do this?  Let me tell you...


As a reminder, this is the before picture.


First, I tried some Dawn dish soap, the blue kind.  I left it on for a long time, then rinsed it out.  While it lightened a little bit, it was still very visible.


I asked around at the HMQS last weekend, and many seemed to think that the Dawn would not be strong enough for the black grease.  They recommended stronger cleaning agents like "Sew Clean."  I didn't really want to use anything stronger on my quilt, so I resorted to unpicking the pink rectangle which contained the grease.  I did this one evening after the boys were in bed.


The next afternoon, I carefully cut away the pink rectangle, still leaving a seam allowance.


Then I used cardstock to help me iron a new piece with a seam allowance.


I pinned it in place.  (This step was easier because all of the seams were originally pressed away from the light pink rectangle.)


Then I appliqued it into place.  It really wasn't any more work than it would be to add a large label.


Then I took it to my Tiara and quilted it with the same design.  6,700 stitches later it was all fixed.


I am pleased with how it looks on the front and the back.  (Cheetah thought it was a good thing that my backing wasn't a true solid, and I agree.)


I know that this may seem like a lot of work for one small  grease spot, but it was worth it to me.

The quilt is now all finished, and I will be sharing it as part of the Blogger's Quilt Festival this weekend.  So here is a sneak peek...


I totally love it!

I just wanted to add a big "Thank you!" to everyone who commiserated with me about the grease spot and offered suggestions for removing it.

XX,
Jasmine

P.S.  I will be linking up with some of the fun parties on my sidebar.  There is something fun for every day of the week.